
| ||||||||||||||||||||||

The Frenzy Barbarian is a dual wielding Barbarian build which uses the Double Swing and Frenzy skills to quickly pummel his enemies to the ground. He takes advantage of his unparalleled movement and attack speed to quickly move from combat to combat, making for a very exciting and fast paced experience. This guide was written and tested for untwinked single player playthrough across all difficulties using patch 1.13. This guide will assume that the player has to rely solely on the items he finds when playing the character.
Playstyle[]
The Frenzy Barbarian combines the quickness of the Frenzy and Double Swing skills with the sheer power of dual wielded weapons to quickly distribute large amounts of damage among several foes. To avoid being outnumbered and overrun, the Frenzy Barbarian also uses the powerful War Cry to stun all nearby monsters for several seconds, effectively allowing him to take as long as he needs to kill his enemies. If need be the character can also utilize many of the skills he aquires while trying to unlock his core abilities, thus becoming extremely versatile and able to deal with any situation.
The main concept which the player must understand when playing the Frenzy Barbarian is control. Though Frenzy is an extremely powerful attack, it should not be overused. Each successful attack with Frenzy greatly increases the character's attack and movement speed up to a certain threshold. While increasing one's attack speed is a powerful ability to have with a melee character, increasing one's movement in the process can be a curse. Even with movement speed increased by only a few percent the Barbarian becomes very difficult to control accurately. Should the movement speed increase to the skill's maximum potential, controlling the movement path of the Barbarian becomes almost impossible. Though the increased movement speed makes it easy to traverse large distances it becomes just as easy to run into dangerous situations or run right past the enemies the Barbarian was trying to attack. One of the most important things when playing a melee character is having control over one's positioning. No matter what you should never get yourself into a corner or surrounded. With the Frenzy Barbarian avoiding such situations can be very difficult.
To combat this downside, the player has to use the Frenzy skill wisely, mostly when all the enemies in the given room are already close by and stunned. This way the player can freely deal damage with Frenzy and increase his attack speed without having to worry about controlling his character. Also, the Frenzy Barbarian has access to several useful abilities which can help him out of any situation which he might find himself in. If surrounded the Howl and Battle Cry skills all have their use, though as the War Cry becomes available, these two skills lose on importance. If the player finds himself surrounded by monsters while ranged monsters attack him from afar, it is best to use Leap Attack to get into a better posistion or dispatch the ranged enemies before the melee foes close in. Again, thanks to the War Cry the player can take as much time as he needs to deal with these ranged enemies as the melee monsters won't be able to pursue. When dealing with masses of extremely dangerous (e.g. Willowisp) or spread out ranged monsters, the Barbarian can draw his enemies in with Taunt, which immediately stops the enemy from firing and draws him into melee range where the Barbarian is in his element. Use this skill whenever closing in on a ranged group of monsters becomes too dangerous. It becomes a necessity in some areas of Nightmare and Hell difficulty so don't forget to use it.
Attribute Point Allocation[]
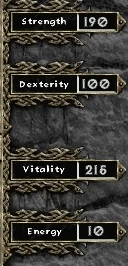
With the Barbarian being purely melee oriented, one must be careful how he distributes his attribute points. Pretty much all the attributes except for Energy are vital to the Barbarian. However the paticular distribution of attribute points depends on the player's choice of weaponry. Depending on whether the player decides to dual wield axes, maces or swords, the point distribution should be adjusted accordingly. However since we are dealing with purely single player character, it is best to choose swords as the weapon to be used. Though there are definitely powerful enough one-handed maces and axes in the game, the number of these weapons is quite low. The most powerful maces and axes can be found among the two-handed types, none of which can be dual wielded. With sword weapons on the other hand, the player can easily use any and all types he can find, whether they be one-handed or two-handed. With swords also being the largest weapon family in the game (containing 14 sword types per tier) it becomes much easier to find powerful rare and unique swords to use. This does NOT mean that axes and maces are not viable, only that using swords will make your playthrough easier. Since the maximum strength requirement for swords is 190, it is best to get this attribute to at least 170 to have a decent chance of being able to use any sword you find. Should you find end game items with high strength bonuses, you can potentially make do with base strength under 150. If you don't want to rely on item bonuses or want to potentially wear better armors and deal more damage, get your base strength up to 190 like I did.
Though the maximum dexterity requirement for swords is in fact 136, it is sufficient if you get your Dexterity to 100. The only swords which greatly exceed this amount are one-handed which usually in the later stages of the game can't keep up with two-handed swords in terms of damage. Two-handed swords also give additional range to your attacks, making it easier for your character to keep some distance between himself and enemy monsters. However this is a matter of preference and also luck in finding the proper sword. Compared to two-handed swords, one-handers attack faster, so if you prefer these, you can move 20 attribute points from Strength to Dexterity to be able to use the best one-handers available.
Needless to say, dump everything else you have into Vitality because you will be tanking a lot of damage. Not wielding any shields means you will be taking a lot of hits when you get attacked and also might have lower resistances than when holding a shield. Luckily enough, the Barbarian has no problem balancing lack of strong defences with tons of health (more on that in Skills section).
You can completely ignore your Energy of course. Though some of your skills will require a good deal of Mana, there are other ways of obtaining extra Mana than wasting valuable attribute points (again see the Skills section below).
Skill Point Allocation[]
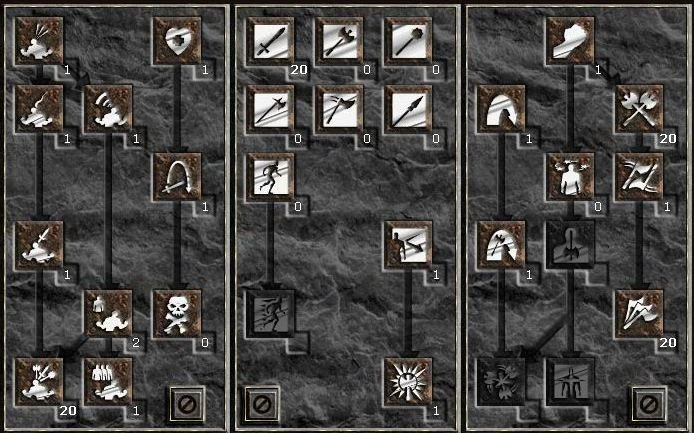
Moving on to the skills, you will naturally see that all the core skills are maxed out. Maxing out the mastery of your choice should be the priority as it will add sufficient amount of attack rating and damage to take you through Normal difficulty without much trouble. However, before you do so it is best to get Double Swing to level 9 as soon as possible. Double Swing not only increases your attack speed, it also adds extra attack rating, bonus damage to Frenzy AND decreases in mana cost with every level. By level 9 you will be able to use Double Swing for free! This will be one of your main attacks for the remainder of the game because it is in and of itself much faster than Frenzy though less damaging, it is for free and it also has no downside. You can use Double Swing any time you are dealing with a Unique monster which hits too hard because with Double Swing you can almost keep the enemy in constant hit recovery. It hits fast enough in fact to keep two enemies in hit recovery most of the time, especially if combined with Frenzy's attack speed bonus. Double Swing is also the best way of dealing with Mana Burn/Mana Drain monsters like Wraiths or Finger Mages. Overall this skill will be your bread and butter and you will be using it any time Frenzy's attack speed is insufficient, your mana is too low or you are out of mana potions, or when for whatever reason using Frenzy would be too dangerous in the given situation. Once you get Double Swing to level 9 you can abandon it and get back to increasing your Mastery. Double Swing should be the last skill to be maxed out.
Now going over to Frenzy, again at first it is probably best to keep maxing out your Mastery. Therefore as soon as Frenzy becomes available, put one point into it, use it, but don't dedicate any additional points into the skill. Frenzy's damage and attack rating are quite high to begin with but in comparison with the Mastery, each point dedicated to Frenzy gives you less of a bonus than if it was dedicated into the Mastery (both Frenzy and Mastery add +5% damage per level, however each point into Frenzy increases attack rating by 7% while Mastery adds 8% per level). Once your Mastery is maxed out you should start distributing points equally between Frenzy and War Cry (with Double Swing on level 9, your Mastery should max out during Act 1 Nightmare). Only after you have maxed out these two skills can you start dedicating points into Double Swing.
Important note: Take all the additional skills you see in the picture Find Item, Battle Command, Leap Attack, Iron Skin, Natural Resistance as soon as they become available, not only later when you have free skill points to spare. All of these are very important to the build even though they do not require more than one point. Needless to say the moment you gain access to Shout, Battle Orders and Battle Command, add them into your everyday skill set. Increased armor, health and mana are invaluable to the character, so keep these skills always on. Preferrably you should use Battle Command before you use Shout and Orders for maximum effect. If Command wears down during a fight, there is no need to recast it, however always always always keep Shout and Orders active. Also, don't forget to use Find Item every time you kill a unique monster. The reason why finding a unique or super unique monster is a good thing is because they drop good items. With this skill, you can get double the reward for the same amount of work. Don't forget to use Battle Command before you activate Find Item.
Finally, you will notice that I have dedicated two points into Battle Orders. The reason for that is that this character's skills peak at level 83 while Hell playthrough sometimes ends at level 84. Therefore it is up to you what skill you dedicate the extra skill point to. I have chosen the Battle Orders simply because there is never enough health and mana, however you can easily increase your Shout, Natural Resistance, Iron Skin, Find Item or whatever other skill you might want.
Gear[]
Thanks to the Find Item skill, chances are you can get quite a good amount of unique gear for yourself and your hireling. I recommend Holy Freeze Mercenary to hold back the masses and more importantly to make fights with uniques like Duriel a little easier. With your incredible attack speed and the slow from Holy Freeze, uniques will have a hard time keeping up with you. Since this build is intended for single player, there is no way to influence what gear you find. However should you find items with good MF percentage, you can swap it over your normal gear after a fight and try Finding Items on the corpses around. You would be surprised how much stuff can be obtained this way.
Also, when looking for good gloves, keep an eye out for some with decent increased attack speed (e.g. Sander's Taboo). Though Double Swing and Frenzy do provide solid attack speed, if you are using two-handed swords you might want to increase your speed a little bit more. This of course goes for one handed swords as well, however with two-handers it is almost a necessity in later difficulties because enemies will stay around a lot longer. It is important that you keep them in recovery mode as much as possible to minimize damage that you take.
Finding cannot be frozen equipment for your character might be slightly more difficult, since the Rhyme runeword which I usually recommend for every character cannot be used by the Frenzy Barbarian. Should you find an item which does provide the cannot be frozen bonus (e.g. Hawkmail) no matter how poor it is compared to the items you have, keep it in your stash. From experience, getting constantly frozen by a unique monster (i.e. monster which is hard to stun by War Cry) makes fighting surprisingly difficult even for a fast class like the Frenzy Barbarian.
Should you find a low tier unique or rare sword with good enhanced damage bonus, don't forget that you can increase a weapon's or armor's tier using the Horadric Cube. See first if the higher tier item will do sufficient amount of damage before you waste your gems and runestones on the recipe however.
Last but definitely not least, I have to mention monsters with the Immune to Physical modifier. You will notice that none of the Frenzy Barbarian's skills deals elemental damage. The only option Barbarians have in this respect is Berserk, however, I do not recommend you taking it. Though in combination with War Cry you can avoid getting hit while your Defence is 0, I believe it is an unnecessary skill point investment which can be easily avoided. Thanks to your ability to dual wield and attack very fast, as well as the ability to find extra items, you can simply equip two fast attacking swords with % chance to cast Amplify Damage on striking. Once you encounter physically immune enemies, you can simply stun them with War Cry, switch weapons to the cursed swords and wait for the Amplify Damage to trigger. When it does you can easily finish off your enemies with your usual weapon set, as physically immune monsters usually don't have much health. Alternatively you could equip high elemental damage swords instead of the cursed ones, but I believe Amplify Damage to be much more effective and easier to find.
_____________________________________________________________________________________________________________________
Well, folks, that's all for this build. Hope you enjoy playing it;-)
| Barbarian Builds | ||
|---|---|---|
| Concentrate Barbarian by Kickin It • Frenzy Barbarian by lMarcusl • Frenzy Barb by Rousse PvP Whirlwind Barbarian by Eskanasi • Whirlwind Barb by Thundarius |