
| ||||||||||||||||||||

Introduction[]
Me[]
I saw my chance to finally create something serious and useful for everyone to see. So here I am, a lonely swede writing my first article. I will try to avoid as many grammatical errors as possible, but since english is my second language, and I'm only 16, you might want to hold on to something...
The Mauler (and links)[]
I searched and searched, but I couldn't find a single up-to-date guide for a Mauler, so I decided to write one myself.
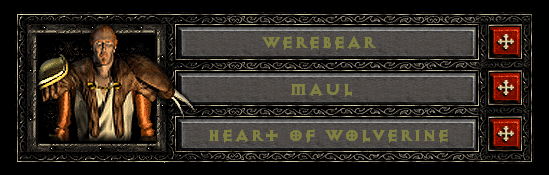
This build is primarily based on the Druid skill Werebear and the skill Maul. The Werebear skill changes the spellcasting Druid into a melee character with decent damage and a large life pool, while Maul raises the decent damage to much higher levels. Most Druids would walk around with a life giving Oak Sage, but not the Mauler. The Mauler is all about damage, so he uses the combat enhancing Heart of Wolverine.
I hope that this 100% theoretical guide is going to help people make a decent Weredruid. If you find a spelling error, please correct it, but don't change grammatical errors because I want this guide to be my words. Every contributor will of course be added to the Thanks To list. Just remember to write what you did in the Summary so I don't have to compare so much.
I am listing the damage and skill efficiencies, but I will only list it for perfect equipment. Perfect equipment includes everything in the equipment section, nothing more.
Reference[]

Diablo Exile - Druid Skill Planner
Diabloii - Facts & Formulae Archive
Attributes & FHR[]

Attributes[]
- Strength: 15
- Weapon Damage +1%
- Dexterity: 20
- Base Defence +0.25
- Base Attack Rating +5
- Vitality: 25
- Life +2
- Stamina +1
- Energy: 20
- Mana +2
The Werebear has the same attribute spending rules as most other builds.
1. Look at your equipment for the item with the highest Strength requirement.
2. You now have 3 options.
- Meet the requirement with base Strength points.
- Meet the requirement with base Strength points and bonuses from Charms.
- Meet the requirement with base Strength points, bonuses from Charms and other items.
You should only use the Strength bonuses from items that are picked up from a corpse before the item with the requirement, or you will have to pick up your corpse multiple times. This is the order:
- Head (helm)
- Neck (amulet)
- Body(armor)
- Right Arm (left weapon/shield slot)
- Left Arm (right weapon/shield slot)
- Right Ring (left ring slot)
- Left Ring (right ring slot)
- Waist (belt)
- Feet (boots)
- Hands (gloves)
Charms stays in the inventory when/if you die.
3. Dextery follows the same rules, but you might want maximum block if you are using a Shield. Use a calculator to find out how much you need.
4. Every spare point goes to Vitality because Energy is useless with high damage + mana leech.
Faster Hit Recovery (Werebear)[]
| 0 FHR | 5 FHR | 10 FHR | 16 FHR | 24 FHR | 37 FHR | 54 FHR | 86 FHR | 152 FHR | 360 FHR |
| 13 Frames | 12 Frames | 11 Frames | 10 Frames | 9 Frames | 8 Frames | 7 Frames | 6 Frames | 5 Frames | 4 Frames |
The Werebear has the worst FHR table if you compare it to any other decent melee build.
This table shows you how many frames it takes you to recover from attacks. This is very important because you can't do anything while your recovery animation is running, you can't even move. The hit recovery animation doesn't run when the block animation is running.
Skills[]
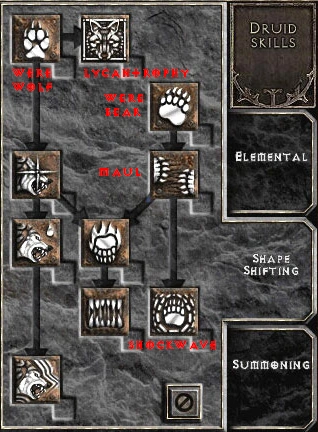
Shape Shifting Skills[]
- Werewolf - 1 Point
A great starting skill and a prerequisite for Lycantrophy.
- Lycantrophy - 20 Points
Increases the duration and life bonus of Werebear. A very powerful passive skill.
- Werebear - 20 Points
Big damage, big life, big defense, big body. What more could you ask for?
- Maul - 20 Points
Increases the damage of the Werebear with successive hits. Without Maul, there is no Mauler.
Summoning Skills[]
- Oak Sage - 1 Point
A nice little starting spirit and a prerequisite for Heart of Wolverine.
- Heart of Wolverine - 20 Points
Increases the damage and attack rating by over 150% in level 20.
Summary[]
This build leaves the field open for customization. It requires 82 skill points and can therefore be complete in level 71. I recommend points in Shockwave or Summon Grizzly if you have no idea how to spend the rest of your points.
Equipment[]
I'm going to include options in 3 categories.
- Optimal - It doesn't get any better than this.
- Good - A good end-game choice.
- Ok - It works but should be replaced.
There will always be atleast one non-ladder option for each category. The order of the items doesn't matter for Good and Ok, but I have arranged the Optimal items in my preferred order for this build. All Helms, Belts, Gloves and Boots are Unique and can therefore be socketed.
Weapon (Main Hand)[]
The goal here is to get good physical damage for Werebear, Maul, and HoW to enhance. It is also important to keep the Frames Per Attack pretty low so you can attack quickly. The final thing to look for is anything that affects your chance to hit, the Werebear is really bad when it comes to AR.
- Optimal
- 1. Grief (Phase Blade) (Ladder Only) Info
This weapon will reach 7 FPA with just 12% IAS from your other equipment, and the damage is awesome. To be more precise; 431-435 damage, so it is also balanced. Another superb modifier (especially for the Werebear) is Ignore Target's Defense. But there is more! The list of good modifiers goes on with 20% Deadly Strike, 35% Chance To Cast Level 15 Venom On Striking, and -20-25% To Enemy Poison Resistance.
- 2. Ethereal Breath of the Dying (Berserker Axe) Info
EBOTDZ is widely used for its great modifiers. The damage can reach 142-424, so it is nowhere near the Grief PB, and it can reach 7 FPA with 87% IAS from your other equipment(20% for 8 FPA). But a weapon can't be judged purely on damage, this weapon has some serious modifiers. -25% To Target Defense, 12-15% Life Stolen Per Hit and +30 To All Attributes makes this weapon a excellent choice.
- Good
- 1. Stormlash (Scourge) Info
This is an excellent bosskilling weapon. You will never reach the 112% IAS required for 8 FPA, but 50% IAS will get you 9 FPA. It does 12-320 damage with some sweet effects. 33% Chance of Crushing Blow and 15% Chance to Cast Level 10 Static Field on Striking. It is an Unique item so you can insert a Shael Rune for more speed and average damage.
- 2. Griswold's Redemption (Caduceus) Info
This Paladin Set item is actually a very good choice for a Weredruid. It comes with 125-146 damage and can reach 8 FPA with 49% IAS. The great thing about this one is that it comes with 3-4 sockets. You can use Shael Runes for insane speed. 4 Shael runes gives you 5 FPA and an average damage increase of almost 50%.
- 3. Doom (Berserker Axe) Info
This well known runeword is often used on mercenaries to give them Holy Freeze, but not today. It can reach 89-273 damage and 9 FPA with 68% IAS. It is actually able to get 8 FPA, but that requires 155% IAS. The greatness of this weapon are the modifiers. It gives a Level 12 Holy Freeze Aura When Equipped, +2 To All Skills, 20% Deadly Strike and 25% Chance of Open Wounds. You can now get another mercenary/weapon on the mercenary, because you have the aura already.
- Ok
- 1. Famine (Berserker Axe) Info
This is a pretty standard damage runeword. It gives 89-273 damage, 11 FPA for 33% IAS (10 FPA at 69% IAS), and really good magic/elemental damage. It has Ignore Target's Defense and 12% Life Stolen Per Hit. The weakness is the slow speed.
- 2. Beast (Berserker Axe) Info
The physical damage of this weapon can only reach 65-198, pretty low. However, this weapon is a treasure if you need modifiers. Here is the list: 20% Chance of Crushing Blow, 25% Chance of Open Wounds, +3 To Werebear, +3 To Lycantrophy, +25-40 Strength, and finally Level 9 Fanaticism Aura When Equipped. The Fanaticism Aura gives +89% damage to your party members, +186% damage to you, +80% Attack Rating and 29% Increased Attack Speed. That reduces the IAS needed for the maximum of 8 FPA to 35%.
- 3. Passion (Berserker Axe) Info
50-149 damage, not good. I didn't even calculate the speed because I know it sucks. But this runeword has one ace up its sleeve. It gives you Level 1 Zeal and +80% Attack Rating. The level of Zeal can be increased to 5 by the other equipment, making it really useful. You pump up your damage with Maul and switch to Zeal for speed. I don't know if this is any good, but it should be ok.
- 4. Oath (Berserker Axe) (Ladder Only) Info
Deals 82-241 damage at 9 FPA with 22% IAS. It can reach 8 FPA with a nasty 75% IAS. It is Indestructible so it can made in an ethereal weapon. The damage would then be 122-360. That's it, there is no fancy modifiers on this one, just damage.
If you can't get your hand on one of these, just enter town over and over again until a shop offers a Cruel weapon with up to 300% Increased Damage. Socket it with a Shael rune and you are good to go.
Shield (Off Hand) & Faster Block Rate[]
| 0 FBR | 5 FBR | 10 FBR | 16 FBR | 27 FBR | 40 FBR | 65 FBR | 109 FBR | 223 FBR |
| 12 Frames | 11 Frames | 10 Frames | 9 Frames | 8 Frames | 7 Frames | 6 Frames | 5 Frames | 4 Frames |
The Werebear has the worst FBR table if you compare it to any other decent melee build.
The FBR works just like FHR, the animation will keep you paralyzed while it is running. If you block a lot and the FBR is too low, then you might find yourself permanently stunned if you are fighting many opponents. This is why many choose to skip a shield and go for more damage with a 2 handed weapon. However, there are very few 2 handed weapons that can beat the Grief PB, so I decided to go with a shield for this build. I might add 2 handed options later.
- Optimal
- 1. Sanctuary (Hyperion) Info
It has 64% base block, 20% Faster Block Rate, +20% Faster Hit Recovery, +20 Dexterity, and All Resistances +50-70%. It is an awesome shield in all categories.
- 2. Phoenix (Hyperion) (Ladder Only) Info
The base block of this shield is 44%, and it gives no resistance so it is not a good defensive shield, but it has some insane modifiers. Level 10-15 Redemption Aura When Equipped is incredibly useful, and it gives +350-400% Enchanced Damage, over 1500 more damage with Grief PB. But if you decide to sacrifice defense for this shield, make sure that you have tons of life leech.
- 3. Stormshield (Monarch) Info
The king of all shields. The base block is 67%, which is awesome for a Druid. It gives 35% Faster Block Rate, Damage Reduced By 35%, Cold Resist +60%, Lightning Resist +25%, +30 To Strength and it is Indestructible. You can socket it with something because it is a Unique item.
- Good
- 1. Gerke's Sanctuary (Pavise) Info
Another great blocking shield with 74% base block, so it's better than the Stormshield. It also gives Replenish Life +15 and All Resistances +20-30%. But it has no FBR so it doesn't reach Optimal status.
- 2. Spirit Ward (Ward) Info
This shield has a base block of 64-74%, so it can be as good as Gerke's. It has 25% Faster Block Rate, All Resistances +30-40%, and 5% Chance To Cast Level 8 Fade When Struck. The Fade skill gives a 71% reduced curse duration, 50% to all resists, and the buff lasts for 204 seconds. This is a great shield if you want to counter elemental attacks. It is Unique so it can be socketed. The downside of this shield is that a Ward requires 185 Strength.
- Ok
- 1. Moser's Blessed Circle (Round shield) Info
This is not a very impressive blocking shield, it has a base block of 57%. The upside with this Shield is that it gives 30% Faster Block Rate, All Resistances +25% and 2 sockets.
Stormshield is not the best choice because this build will take damage reduction from other sources.
Armor (Body)[]
- Optimal
- 1. Chains of Honor (Archon Plate) Info
This runeword is crazy! +2 To All Skills, 8% Life Stolen Per Hit, +20 To Strength, Replenish Life +7, All Resistances +65%, and finally Damage Reduced By 8%. This is the king, queen and big mama of armors. It is also extremely expensive.
- 1. Enigma (Archon Plate) Info
I don't like this armor, but many people do. It gives +2 To All Skills, +45% Faster Run/Walk, +1 Teleport (!), +0-74 Strength, Increase Maximum Life 5%, Damage Reduced By 8%, and +14 Life After Each Kill. It is a great armor, but it gives no resistance. Reaching good resistance is very hard with this armor, but everything else about it is awesome.
(Teleport does not work in Werebear form, so using it leaves you very vulnerable and weak.)
- Good
- 1. Guardian Angel (Templar Coat) Info
Just look at the sweetness of this armor. +20% Increased Chance Of Blocking, +30% Faster Block Rate, 15% To Maximum Resistances. This is the best blocking armor, but the maximum resistance bonus is useless if we are unable to reach it. I would socket it with a resistance jewel.
- Ok
- 1. Tyrael's Might (Sacred Armor) (Ladder Only) Info
A great armor with sweet modifiers. +20% Faster Run/Walk, +20-30 To Strength, All Resistances +20-30%, Cannot Be Frozen, Slain Monsters Rest in Peace, and it is indestructible. You can also insert a good jewel or rune to make it even better. The primary weakness of this armor is the low resistance bonus.
- 2. Duress (Archon Plate) Info
This is a pretty good offensive armor. It gives +40% Faster Hit Recovery, +10-20% Enchanced Damage, 15% Chance of Crushing Blow, 33% Chance of Open Wounds, +15% Fire/Lightning/Poison Resist, and +45% Cold Resist. It gives too low resistance to be a working end-game choice.
- 3. Duriel's Shell (Cuirass) Info
Resist Fire/Lightning/Poison +20%, Resist Cold +50%, Cannot Be Frozen and +15 To Strength. A simple but working mid-game armor.
- 4. The Spirit Shroud (Ghost Armor) Info
The poor mans choice. With 3 good modifiers; Cannot Be Frozen, +1 To All Skills and Replenish Life +10, this armor is a good choice if you are really poor. The Cannot Be Frozen modifier is priceless.
Helm (Head)[]
- Optimal
- 1. Vampire Gaze (Grim Helm) Info
This helm is the preferred choice of most physical damage characters. 6-8% Life Stolen Per Hit, 6-8% Mana Stolen Per Hit and Damage Reduced By 15-20%. What more could a physical tank character want?
- 2. Harlequin Crest (Shako) Info
A superb helm with +2 To All Skills and Damage Reduced By 10%. The 1.5 Life and Mana per Character Level is also pretty useful. There is nothing more to be said about this one. A great choice.
- 3. Crown of Ages (Corona) Info
+1 To All Skills, Damage Reduced By 10-15%, All Resistances +20-30%, +30% Faster Hit Recovery, Indestructible, and it comes with 1-2 sockets. I prefer Harlequin Crest over this one. Why? Simple, it requires 174 Strength, and the skills bonus is worse than that of the Harlequin Crest. It might still be a better choice if you need resistance and socket it with resistance jewels.
- Good
- 1. Veil Of Steel (Spired Helm) Info
Short on resistance? Then this is the helm for you. The +15 Strength and Vitality is nothing compared to the third good modifier; All Resistances +50%! This is a great way to increase your resistance if you went with Enigma for your end-game armor choice.
- Ok
- 1. Andariel's Visage (Demonhead) Info
This is a modifier bomb. +2 To All Skills, 20% Increased Attack Speed, 8-10% Life Stolen Per Hit, +25-30 To Strength, +10% To Maximum Poison Resist, Fire Resist -30%, and Poison Resist +70%. It is a great overall helm, but it lacks the little extra.
I'm going to add anextra category for helms because there are so many helms that are good but too bad for the top 3 categories.
- Poor
- 1. Peasant Crown (War Hat) Info
A helm with nice benefits. +1 To All Skills, 15% Faster Run/Walk, Replenish Life 6-12, +20 To Strength and Vitality. Socket it with something useful and it works fine for most of the game.
- 2. Stealskull (Casque) Info
Simple but effective modifiers. 10% Increased Attack Speed, +10% Faster Hit Recovery, and 5% Life and Mana Stolen Per Hit.
Belt (Waist)[]
- Optimal
- 1. String of Ears (Demonhide Sash) Info
2 modifiers makes this belt awesome. 6-8% Life Stolen Per Hit and Damage Reduced By 10-15%
- Good
- 1. Nosferatu's Coil (Vampirefang Belt) Info
This belt gives a little of everything. Slows Target By 10%, 5-7% Life Stolen Per Hit, +15 To Strength, and 10% Increased Attack Speed. But it doesn't have the damage reduction that makes other belts so invaluable.
- 2. Verdungo's Hearty Cord (Mithril Coil) Info
The belt of a true tank. It has all of your favourite defensive modifiers; +10% Faster Hit Recovery, +30-40 Vitality, Replenish Life +10-13, and Damage Reduced By 10-15%. A great choice for any build.
There is no Ok category for the belts. Or to be more precise, there are so many ok belts that I'm not listing them.
Gloves (Hands)[]
- Optimal
- 1. Steelrend (Ogre Gauntlets) Info
The gloves of damage. +30-60% Enhanced Damage, 10% Chance of Crushing Blow, and +15-20 To Strength. These are awesome gloves, the downside is that they require 185 Strength.
- Good
- 1. Dracul's Grasp (Vampirebone Gloves) Info
Dracul's, a name that describes them well. If you need health, then these are the gloves for you. +10-15 To Strength, +5-10 Life After Each Kill, 25% Chance of Open Wounds, +7-10% Life Stolen Per Hit, and 5% Chance To Cast Level 10 Life Tap On Striking.
- Ok
- 1. Soul Drainer (Vambraces) Info
The baby Dracul's. 5-7% Life Stolen Per Hit, 5-7% Mana Stolen Per Hit, and 8% Chance To Cast Level 8 Weaken On Striking. They are good, but Dracul's are better.
- 2. Venom Grip (Demonhide Gloves) Info
The baby Steelrend/Dracul's. 5% Chance of Crushing Blow, 5% Life Stolen Per Hit, 5% To Maximym Poison Resist, and Poison Resist +30%. A weak combination of Dracul's and Steelrend.
We can use the 185 Strength gloves because they are picked up last. This means that all other items in your inventory can help you equip it without any risks.
Boots (Feet)[]
- Optimal
- 1. Gore Rider (War Boots) Info
These boots are so lovely. The modifiers are a gift from the gods. 30% Faster Run/Walk, 10% Chance of Open Wounds, 15% Chance of Crushing Blow, and 15% Deadly Strike. These are definitely the boots of choice.
- Good
- 1. Sandstorm Trek (Scarabshell Boots) Info
Great tanking boots. +20% Faster hit Recovery, +20% Faster Run/Walk, +10-15 To Strength, +10-15 To Vitality, and Poison Resist +50-70%. It also repairs itself. Great boots.
- 2. War Traveler (Battle Boots) Info
There is one modifier on this item that makes it very good. 25% Faster Run/Walk, +10 To Vitality and Strength, and the popular Adds 15-25 Damage. These are good, but the little damage bonus is more useful for quick attacking characters, not for relatively slow attacking Werebears.
- Ok
- 1. Waterwalk (Sharkskin Boots) Info
An ok pair of boots. 20% Faster Run/Walk, +15 To Dexterity, +5% Maximum Fire Resist, and +45-65 Life. Nothing special about these.
Both Open Wounds and Crushing Blow are useful for any physical build, and the FRW/Deadly Strike modifiers aren't so bad either.
Amulet (Neck)[]
- Optimal
- 1. Highlord's Wrath Info
+1 To All Skills, +20% Increased Attack Speed, + 0.375 Deadly Strike Per Character Level, and Lightning Resist +35%. This amulet will get Grief PB to 7 Frames and EBOTDZ to 8 Frames. It is the most practical way to get it without wasting sockets. Non-ladder characters can choose another amulet because they have to use many Shael runes with or without it.
- 2. Mara's Kaleidoscope Info
A simple amulet. +2 To All Skills, All Resistances +20-30%, and +5 To All Attrbutes. This is a good amulet to use while you are improving your other resistance gear. You don't need this amulet to get max resistance.
- Good
- 1. The Eye of Etlich Info
A decent amulet with +1 To All Skills and 3-7% Life Stolen Per Hit. A good choice.
Rare and crafted amulets can become extremely powerful. They can sometimes even become the optimal choice, but that is very rare.
- Ok
- 1. The Cat's Eye Info
A speed amulet. +30% Faster Run/Walk, +20% Increased Attack Speed, and +25 To Dexterity. It is a very good amulet, but it isn't optimal for this build.
- 2. Crescent Moon Info
This amulet will solve all your mana problems. 10% Damage Taken Goes To Mana, +45 To Mana, 11-15% Mana Stolen Per Hit, and 3-6% Life Stolen Per Hit.
A decent Rare amulet is usually good enough to last through Hell. These amulets are for when you want perfection, they are not necessary.
Rings (Fingers)[]
- Optimal
- 1. Crafted Ring Info
The crafted rings can become insanely powerful.
- 1. Raven Frost Info
Get one Raven Frost! The Cold Absorb 20% is good, the +15-20 Dexterity is good, but the Cannot Be Frozen modifier is EXTREME!!!
- 2. Bul-Kathos' Wedding Band Info
+1 To All Skills, +0.5 Life Per Character Level, and 3-5% Life Stolen Per Hit. It is the best Unique ring you can find for this build.
- Good
- 1. Carrion Wind Info
6-9% Life Stolen Per Hit, Poison Resist +55%, and 10% Damage Taken Goes To Mana. It is a good ring because of the life leech.
- Ok
- 1. Cathan's Seal Info
6% Life Stolen Per Hit. Nothing more than that, but who doesn't want life leech?
- 2. Rare Rings Info
You can find great rare rings that are better than both Cathan's and Carrion, but most are not.
You don't have to trade rings to be good, you can live with what you find.
Charms (Inventory)[]
I will only include the 2 primary charms.
Hellfire Torch (Large Charm) Info
+3 To All Character Skills (The character class is randomized.), +10-20 To All Attributes, All Resistances +10-20%, and 25% Chance To Cast Level 10 Firestorm On Striking. Firestorm is one of Diablo's special attacks.
Annihilus (Small Charm) Info
+1 To All Skills, +10-20 To All Attributes, All Resistances +10-20%, +5-10% Experience Gained.
Not much to say, get them if you can.
Switch (Main/Off Hand)[]
Call To Arms (1 handed weapon) Info
This weapon is used to buff yourself, so I will only include the modifiers that affects the buff casting. +1 To All Skills, +2-6 To Battle Command, +1-6 To Battle Orders. I will explain the effects better in the next section.
Spirit (light shield) (Ladder Only) Info
It is used to enchance the buffs of Call To Arms. +2 To All Skills, +25-35% Faster Cast Rate, and a bunch of defensive modifiers to protect you while buffing.
Spirit is the best choice, but all shields with +To Skills are good.
Total (Combined Bonuses)[]
Here are the complete bonuses (the most useful) you would get from a perfectly equipped character (Ladder, no Rare/Crafted items, no runes/jewels).
Base Offense
Weapon Damage = 431 - 435
Speed = 7 FPA
Offensive Modifiers
Ignore Targets Defense
Enchanced Damage = 60%
Deadly Strike(double damage) = ca 70%
Crushing Blow(next section) = 25%
Open Wounds(next section) = 10%
Offensive Effects
Level 35 Venom (35%)
-25% Enemy Poison Resistance
Level 10 Firestorm (25%)
Base Defense
Base Block = 64%
Faster Block Rate = 20% (9 Frames)
Faster Hit Recovery = 20% (10 Frames)
Resistance
Fire = 175%
Cold = 175%
Lightning = 210%
Poison = 175%
Cold Absorb 20%
Stats Modifiers
Strength = 80
Dexterity = 80
Vitality = 40
Energy = 40
Other Modifiers
Cannot Be Frozen
10% More Experience Gained
+ To All Skills = 5
+ To Druid Skills = 3
Damage Reduction = 43%
Life Leech = 29%
Life Regeneration = 7
Life Per Character level = 0.5
Mana Leech = 8%
Run and Walk = 30%
Efficiency[]
Most of this section is unnecessary to read, but it gives some interesting information on how to calculate the efficiency of each skill. Info about the effects of Call To Arms and your final damage is also located in this section.
Skills[]
These doesn't include a possible bonus from Call To Arms.
Werebear
Level 28
Life: +140%
Duration: 460 Seconds
Damage: +239%
Defense: +160%
Lycantrophy
Level 28
Life: +155%
Duration: +580 Seconds
Heart of Wolverine
Level 28
Life: 782
Damage: +153%
Attack: +158%
Radius: 45.3 Yards (the distance between 2 opposite corners on the maximum resolution is 23 Yards)
Maul
Level 28
Stun Length: 3.6 Seconds
Damage: +20-340%
Attack: 290%
Damage Calculations[]
So, let's find out the maximum final damage with the suggested equipment and all buffs. It is based on 100 Strength, just add 4.53 damage per extra Strength point.
The formula for stats damage is:
- 1.1 X Strength for Hammers
- 0.75 X Strength + 0.75 X Dexterity for Claws/Daggers/Throwing Weapons
- 1 X Dexterity for Bows/Crossbows
- 1 X Strength for everything else
Forget every math rule and do the math in the order it is listed in.
1 (Default 100% Damage.)
+
1 (100 Strength = +100% Damage = 1)
+
2.39 (+239% Damage from Werebear)
+
1.53 (+153% Damage from HoW)
+
3.4 (+340% Damage from Maul)
+
0.6 (60% Damage from Steelrend)
X
435 (Average Weapon Damage)
Final Damage = 9.92 X 435 = 4315.2
Remember that this doesn't include runes, jewels or charms (other than Torch and Anni).
The chance to do Deadly Strike will be higher than 70% in level 99, which means that the total damage is increased by 70%. This brings the final damage closer to 7500.
Open Wounds
Open Wounds doesn't work like other Damage over Time effects like Venom. It has a damage calculation based on your character level. This is the formula for characters between level 61 and 99 per frame.
((45 X Character Level - 1319) / 256)
A character in level 95 would do around 11.5 damage per frame. That is 287.5 damage per second. It lasts for exactly 8 seconds, can't be dispelled, and it prevents enemies from regenerating life. The damage is 50% against bosses, 25% against players when using melee attacks, and 12.5% against players when using ranged attacks.
Crushing Blow
This is one of the most powerful modifiers in Diablo 2. Before listing the damage I will describe how it works. It will divide the current(not maximum) life of your target based on a modifier.
The life of enemies is increased by 50% per player in the game (not with the first player). Crushing Blow does not increase its damage when the target has more life, this is because it is always based on the base life of a enemy (the life it would have in a solo game). So this modifier is actually more effective in a solo game than in a 8 player game.
This is the modifiers of Crushing Blow, straight from strategy.dii.net
Normal Monster hit with a melee weapon: 1/4
Normal Monster hit with a ranged weapon: 1/8
Boss/Champion Monster hit with a melee weapon: 1/8
Boss/Champion Monster hit with a ranged weapon: 1/16
Player/Hireling hit with a melee weapon: 1/10
Player/Hireling hit with a ranged weapon: 1/20
This does not mean that you will kill any normal monster in 4 hits, it is based on the current life of the target. It is like having 100% life and then removing 25%, you would then have 75% left. The next attack would remove 25% of 75%, which is 56.25%, not 50% as you might think. This can therefore not be used to kill an opponent, but it will increase your killing speed by A LOT (especially when fighting bosses).
Call To Arms[]
Call To Arms gives any class the skills Battle Orders and Battle Command, two very useful abilities.
Battle Command increases nearby allies skill levels by one for a set duration. This will power up all of your abilities, including those you get from items such as Battle Orders. The skills you get from items are also affected by items with + To All Skills, so the maximum level of Battle Command is increased to 11. It will last for 105 seconds.
Battle Orders is an extremely powerful skill that increases your life and mana by a lot. It will also use the + To All Skills bonuses, and the bonus from Battle Command, this is why you ALWAYS cast Battle Command before you cast Battle Orders. It will last for 85 seconds and increase your maximum life and mana by 68%.
Leveling Guide[]
Level 1-20[]
- The first thing you do is cleanse The Den Of Evil. The obvious reason for this is that you will get a skill point.
- Now it is time for some levels. Do tristruns with other people until you no longer get any significant bonus.
- Kill Andariel and move on to Act 2. Try to find a party for the first quest; to kill Radament for another skill point.
- Find a party and destroy the Claw Viper Altar so you can enter The Arcane Sanctuary.
- Kill The Summoner and start doing Tombruns to level 20.
Level 20-40[]
I will not recommend cowruns even if it is the best choice. I count cowruns with high level characters as rushing.
- Kill Duriel and Mephisto. The only way to do Act 3 quickly is to get the waypoints from someone, which I find ok in this case.
- Do Diaruns. Join Diablo 4 Quest games if you have to (after you have done it the first time), but remember to leave when it gets full.
- When you are in level 29, kill The Ancients and start doing Baalruns until you are in atleast level 40.
- Take the opportunity to get some good equipment because Nightmare is next.
Level 40-60[]
- This is pretty simple. Get to Baal as quickly as possible and do more Baalruns.
Level 60-80[]
- You guessed it, more Baalruns! But this time in Hell.
Level 80-99[]
- It is time to do some quests. Finish all quests that gives you skill points, stats points, life or resistance.
- Get decent equipment. It is ok to follow the bots now.
- Do more Baalruns.
- Do more Baalruns.
- Do more Baalruns.
- Do a Uber Tristrun if you get the opportunity.
- Do more Baalruns.
The Ways Of The Noob[]
I'm actually not against this, I do it myself, but I will still not recommend it.
1. Get someone to rush you to Act 4 Hell and do Diaruns. Do Baalruns in level 60+.
2. Get someone to trap an Uber Tristram boss and create a flow of enemies. Take cover and let high level characters rocket boost your experience.
Tools[]
A quite accurate damage/speed calculator is included in my excel archive too.
This is a great calculator, and it will be updated for 1.13.
This is the first part of a large project I am working on, I decided to finish a part for this guide. It might have bugs.
Content:
(Werebear Only)
- FCR Table/Calculator
- FHR Table/Calculator
- Base Attack Rating
- Attack Speed Calculator (Standard/Maul attacks only)
(General)
- Chance To Hit
- Base Defense Rating
- Chance To Block
- Damage Calculator
- Overview (with DpS calculation)
Thanks To[]
- Asynchronic (pointed out that Teleport doesn't work in Werebear form)
- Roehn (corrected the damage bonus from Maul)
--MetaLynX [emilemil1] 17:08, 1 October 2009 (UTC)
| Druid Builds | ||
|---|---|---|
| Elemental Druid by ReBjorn • Elementalist by lMarcusl • Mauler by emilemil1 Werewolf Druid by Zhar • Wind Druid by Nadenitza |